As part of my interview process, I was fortunate enough to interview Sinora Antonia Salas, Chamorro teacher, who shared with me a wonderful coconut leaf weaving resource titled, "The Guide to Basket Weaving, Creative Weaving with Coconut Palms" written by Robert Morrison and Auntie Healani.
The following are snapshots taken from the resource detailing steps for weaving a fruit basket, which requires various mathematics steps that must be followed in detail. You'll notice various mathematical wording in each of the steps, including the following: one side, 16 leaves, same width, 40 inches long, each end, midrib thin enough, even circle, one hand, first leaf, spaced evenly, circle is tied, making a circle, two notches, let the circle go, cut two more notches, on the opposite side, with the first cut, repeat cuts on the other end, bend the frond into a circle, lining up the notches, tie the circle, at each end, one end of the string, one direction, wrap the other end, other notches, in the opposite direction, tie three knots, hold the circle, leaflets facing down, direction the leaves are pointing, under the first leaf, over and under the next six leaves, in the direction the leaves are pointing, around the circle, turn the bowl upside down, tighten and even the basket, pull each leaf down, turn the bowl right side up, through the center, turning the bowl upside down, holding all the leaves upward, take out one leaf in front, count seven leaves, bring it across the leaves on the opposite side of the circle, inserting it under the seventh leaf, first leaf behind the leaf, bring it across the circle through the sixth leaf, finish the bottom circle, grasp one leaf, working in the direction that the leaves overlap at the center of the bowl, adjusts the star pattern at the bottom, star leaves tend to bend in the opposite direction, turn the bowl upright, working from the inside and outside, hold a finger at the intersection of leaves and push upward on the star leaf from the bottom, pull on the opposite leaves, a little at a time, bottom is flat with the circle, and weave the ends of the leaves & plait them outside the bowl.
FRUIT BASKET STEPS:

Step 1: Select a section on the one side of the frond with 16 leaves that are the same width and at least 40 inches long. Take a leaf off each end, and shave the midrib thin enough to make an even circle when it's bent.
Step 2: Hold the leaves in one hand, with the midrib facing down.
 Step 3: Cut where the first leaf was pulled off, so that leaves will be spaced evenly when a circle is tied.
 Step 4: Making a circle, cut two notches on the midrib, and let the circle go. Hold the leaf with the midrib facing you, and cut two more notches on the opposite side, even with the first cut. Repeat the same cuts on the other end.
 Step 5: Bend the frond into a circle, lining up the notches. Tie the circle with strong, leaving plenty of string at each end. Wrap one end of the string around the midrib and notches, going in one direction. Then wrap the other end of the string around the midrib and the other notches, in the opposite direction. Tie three knots and cut off the excess string.
 Step 6: Hold the circle with the leaflets rib facing down. You will be working in the direction the leaves are pointing. Starting with any leaf, weave under the first leaf, then over and under the next six leaves. Continue working in the direction the leaves are pointing, finishing the rest of the leaves around the circle.
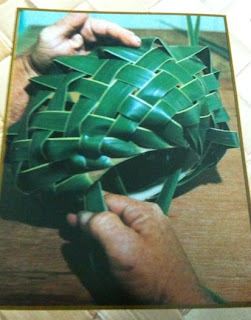 Step 7: Turn the bowl upside down, with the leaves going down. To tighten and even the basket, start with any leaf and pull it tightly at the midrib. Continue to pull each leaf down snug. This process should be repeated until the weaving is evenly tightened.
 Step 8: Turn the bowl right side up. Looking through the center of the bowl, push all the leaves through the bottom.
 Step 9: Start by turning the bowl upside down and holding all leaves upward. Take out one leaf, starting with the leaf in front, and count seven leaves in the direction they are leaning. Start with the leaf hanging out and bring it across the leaves on the opposite side of the circle, inserting it under the seventh leaf.
 Step 10: Start with the first leaf behind the leaf you just inserted, and bring it across the cirlce through the sixth leaf.
 Step 11: In that fashion, finish the bottom circle. Grasp one leaf and the opposite side leaf, then pull away from the bowl. Keep going with the same process, working in the direction that the leaves overlap at the center of the bowl.
 Step 12: This step adjusts the star pattern at the bottom of the bowl. Star leaves tend to bend in the opposite direction than they should be going. Turn the bowl upright. Working from the inside and outside, hold a finger at the intersection of leaves and push upward on the star leaf from the bottom. Turn the bowl over. Working as before, pull on the opposite leaves to tighten a little at a time. Finish tightening until the bottom is flat with the circle.
 Final step: Optional: Cut the tips of the leaves. To finish the bowl, weave the ends of the leaves and plait them outside the bowl. Cut off excess leaf ends.
Completed fruit basket!
Reference:
Morrison, R. & Healani, A. (2000). The Guide to Basket Weaving, Creative Weaving with Coconut Palms. 'Aiea, HI: Island Heritage Publishing.
Salas, A. Personal INTERVIEW. 26 March 2010.